Pelican is the static site generator that powers this blog. It is written in Python and I like it for its simplicity and sane defaults.
Pelican’s functionalities can be extended by writing plugins. These pieces of code, also written in Python, allow to perform actions at the different stages of the build process.
The documentation does not say much about plugins development. The aim of this post is to provide enough information so that you could write your own plugins.
Install plugins
Before we talk about plugin development, let’s see how we can use plugins written by other people.
There is this GitHub repository that hosts a large collection of plugins. We can observe here that a plugin is just a bunch of Python files, and sometimes a few static assets.
In order to install a plugin, create a directory at the root of your Pelican
installation. Let’s say that this directory is called plugins. Then, we’ll
retrieve a plugin’s folder and put it inside plugins. So we will end
up with something like plugins/nice_plugin.
Finally, we’ll edit pelicanconf.py and register our plugin:
PLUGINS = ['plugins.nice_plugin'] # Obviously matches the names of the directoriesThat’s it! Provided that the plugin correctly connected to one (or more) signals (keep reading to know more), it will have a chance to run during the build process.
Consuming plugins is very easy but sometimes, you have to write your own, or patch an existing one.
The hooks
Pelican’s build process is a sequential procedure. Oversimplified, it would look like this:
- Scan for all the posts’ paths
- Read their content
- Transform their content to HTML
- Write the HTML to the output directory
Now, let’s imagine that, for each of these steps, you could have a chance to run a function. On step 2, the function could look like this:
def on_read_content(content):
  # content is the "raw" content of an article, before it is
  # transformed to HTML
  pass
Of course, on_read_content would be called for each article that Pelican
is able to read. Moreover, any modification that you do to the content
object that is received as parameter would be preserved for the rest of the
build process.
Such function is usually called a callback, or a hook. It is called automatically when a corresponding event happens in the build process. But how do we associate an event and a hook function?
The signals
In order to associate an event to an actual hook function, we use Pelican’s signals API. Pelican emits signals at each step of the build process, so we just subscribe to these signals and wait for our functions to be called.
Take a look at this page for a complete list of signals. Each signal is associated with arguments. These are the arguments your hook functions must receive. Hook function signatures are strictly enforced by the caller (Pelican’s core) and must be respected.
Here are signals that are often used, associated with example plugins:
initialized
Pelican’s startup: nothing has happened yet.
get_generators
Happens when Pelican collects the generator objects. Use it if you want to create a custom generator (keep reading to know more).
article_generator_write_article
Happens before writing each article. You get the generator instance for the article being processed, and the actual article (including its metadatas) as parameters. You could write a plugin to calculate the read time of an article here.
page_generator_write_page
The same as article_generator_write_article, but for pages instead of
articles.
all_generators_finalized
Happens before the writing to the output directory. You get generator objects for all documents as parameters. This would be a good place to generate a sitemap, for example.
finalized
Happens when Pelican has finished and is about to exit. As stated in the documentation, this is the right place to minify assets for instance.
Toy module
Let’s write a toy module that outputs the title of the articles when they are written as HTML to the output folder, as well as the path they are written to.
First, let’s find the right signal to subscribe to. Looking at the
documentation, content_written looks like a good candidate. Here is the
description:
Invoked each time a content file is written.
The parameters we must receive in our callback are named path and
context. There is no type definition in the documentation to my knowledge
so you will have to explore Pelican’s source code or read other people’s
module in order to understand the actual types of these variables. Of course,
you can also use Python’s introspection with dir or .keys() while writing
the module.
For this particular signal, path is exactly what you think it is: a string,
that stores the path of the output file that the article being processed is
written to. context is a bit more complex. It is a global dictionary
object that is used virtually everywhere and contains any piece of
information you would need. As its name suggests, its content changes
depending on the context.
So let’s start writing code. First, create the plugins/toy subdirectory
and register the module in Pelican’s configuration. Then, we’ll create the
plugins/toy/toy.py file and populate it with:
from pelican import signals


# Hook function, with the right parameters
def run(path, context):
    print(path)


# Module entry point
def register():
    # Connect the run hook function to the content_written signal
    signals.content_written.connect(run)
The register function is your plugin’s entry point. This is usually where
you would connect your hook functions to the signals. The run function can
have any name but must have the right function signature.
Let’s run it:

Wups! Our plugin actually is a Python package so Pelican imports it and try
to call its register function. In order to expose it, let’s create the
plugins/toy/__init__.py file with the following content:
from .toy import registerNow it works:
There is one problem we can immediately observe: our plugin does not make any
difference between articles (what we are interested in), and other document
types (such as pages). How can we know what is the type of the document being
processed? The context can help.
Indeed, if the document being processed is an article, context would have an
article key. Otherwise, it would not. Let’s update our run function:
def run(path, context):
    if 'article' in context:  # Is the current document an article?
        title = context['article'].title  # Retrieve its title
        print(f'{title} written to {path}')
The context object allowed us to determine the type of the document being
processed. It also allowed us to access the article’s title.
Our toy module is now complete!
The right signal
Our toy module works great but the key presence checking part to determine the
actual type of the article feels a bit hacky. There is actually another signal
that is useful to us: article_generator_write_article. It happens when an
article is about to be written (no need for key presence checking then).
We can refactor our toy module to use this signal instead:
from pelican import signals


def run(article_generator, content):
    print(f'{content.title} written to {article_generator.path}')


def register():
    signals.article_generator_write_article.connect(run)
We effectively get the same output and this version feels “right”. Most plugins can be implemented using different signals. Some of them may be semantically more correct or easier to use than others for a particular use case but it will most likely not make a big difference at the end of the day.
In this particular case, there is a little difference.
article_generator_write_article is called before the article is written,
whereas content_written is called after. Depending on what you exactly
want to do, this could matter.
Read, Generate, and Write
Pelican’s internals documentation teaches us that the build process is divided between different entities. They are the readers, the generators, and the writers.
A reader is responsible for reading the raw files from the disk. For each file, it parses its metadatas and transforms its content into the desired target output format. Pelican ships with a bunch of readers and the most used one probably is the Markdown one. Click here to see how it looks. Beside its format, a reader does not have any clue about the document it is working with. A generator has.
A generator receives inputs (including the readers’ outputs) and transforms
them into actual pages for your sites. Articles, pages, categories, tags,
archives… It all happens here. The generator organizes the data that it got
from the readers and updates the context. Click here to take a look at the generator for the articles.
When he is finished, the generator calls a writer.
A writer, as its name suggests, writes the output directory and transform the in-memory documents that the generator crafted into actual files that ultimately constitutes your website. Pelican ships with a single writer, see it here.
Pelican’s plugin API allows you to write custom readers, generators, and writers.
Writing a custom reader allows you to integrate a new source format to Pelican. For example, you could be very fond of the AsciiDoc syntax and develop a reader plugin so that you can write your posts in AsciiDoc. This is the perfect use case and such module actually already exist. Of course, the parsing can be delegated to a module. You are writing Python after all!
Writing a custom generator is great if you want to create an entirely custom page for you site. A lot can be done by tweaking your theme and its templates but sometimes, you feel that a generator is necessary, especially if you need to implement a lot of logic. See the next section to know more.
Writing a custom writer is not a very common task. Most plugins developers end up doing the writing part directly into the generator, which does not seem to be a bad practice.
JavaScript Index Generator Module
Let’s write another plugin. This one is going to be a custom generator. Our aim is to generate a JavaScript “index” for our site. Basically, I want to have some kind of introspection that allows me to write client side code like this:
const url_split = window.location.href.split("/");
const last = url_split[url_split.length-1].replace('.html', '');

const distances = API.map(({ title, slug }) => ({ title, slug, score: levenshtein(last, slug) }));
const sorted = distances.sort((a, b) => a.score > b.score);
const results = sorted.slice(0, 5);
I use this piece of code in my 404 (note the missing s in the link’s URL) page in order to automatically fix some broken links. I have a complete article coming on this topic but here was this script does:
- Retrieve the slug that the user requested
- For each page of the site, compute the Levenshtein distance between its slug, and the one the user required
- Sort the results
- Extract the top 5 results, at most
How does this script now about all the slugs of my site and their associated
titles? What is this API object? Here is how it looks:
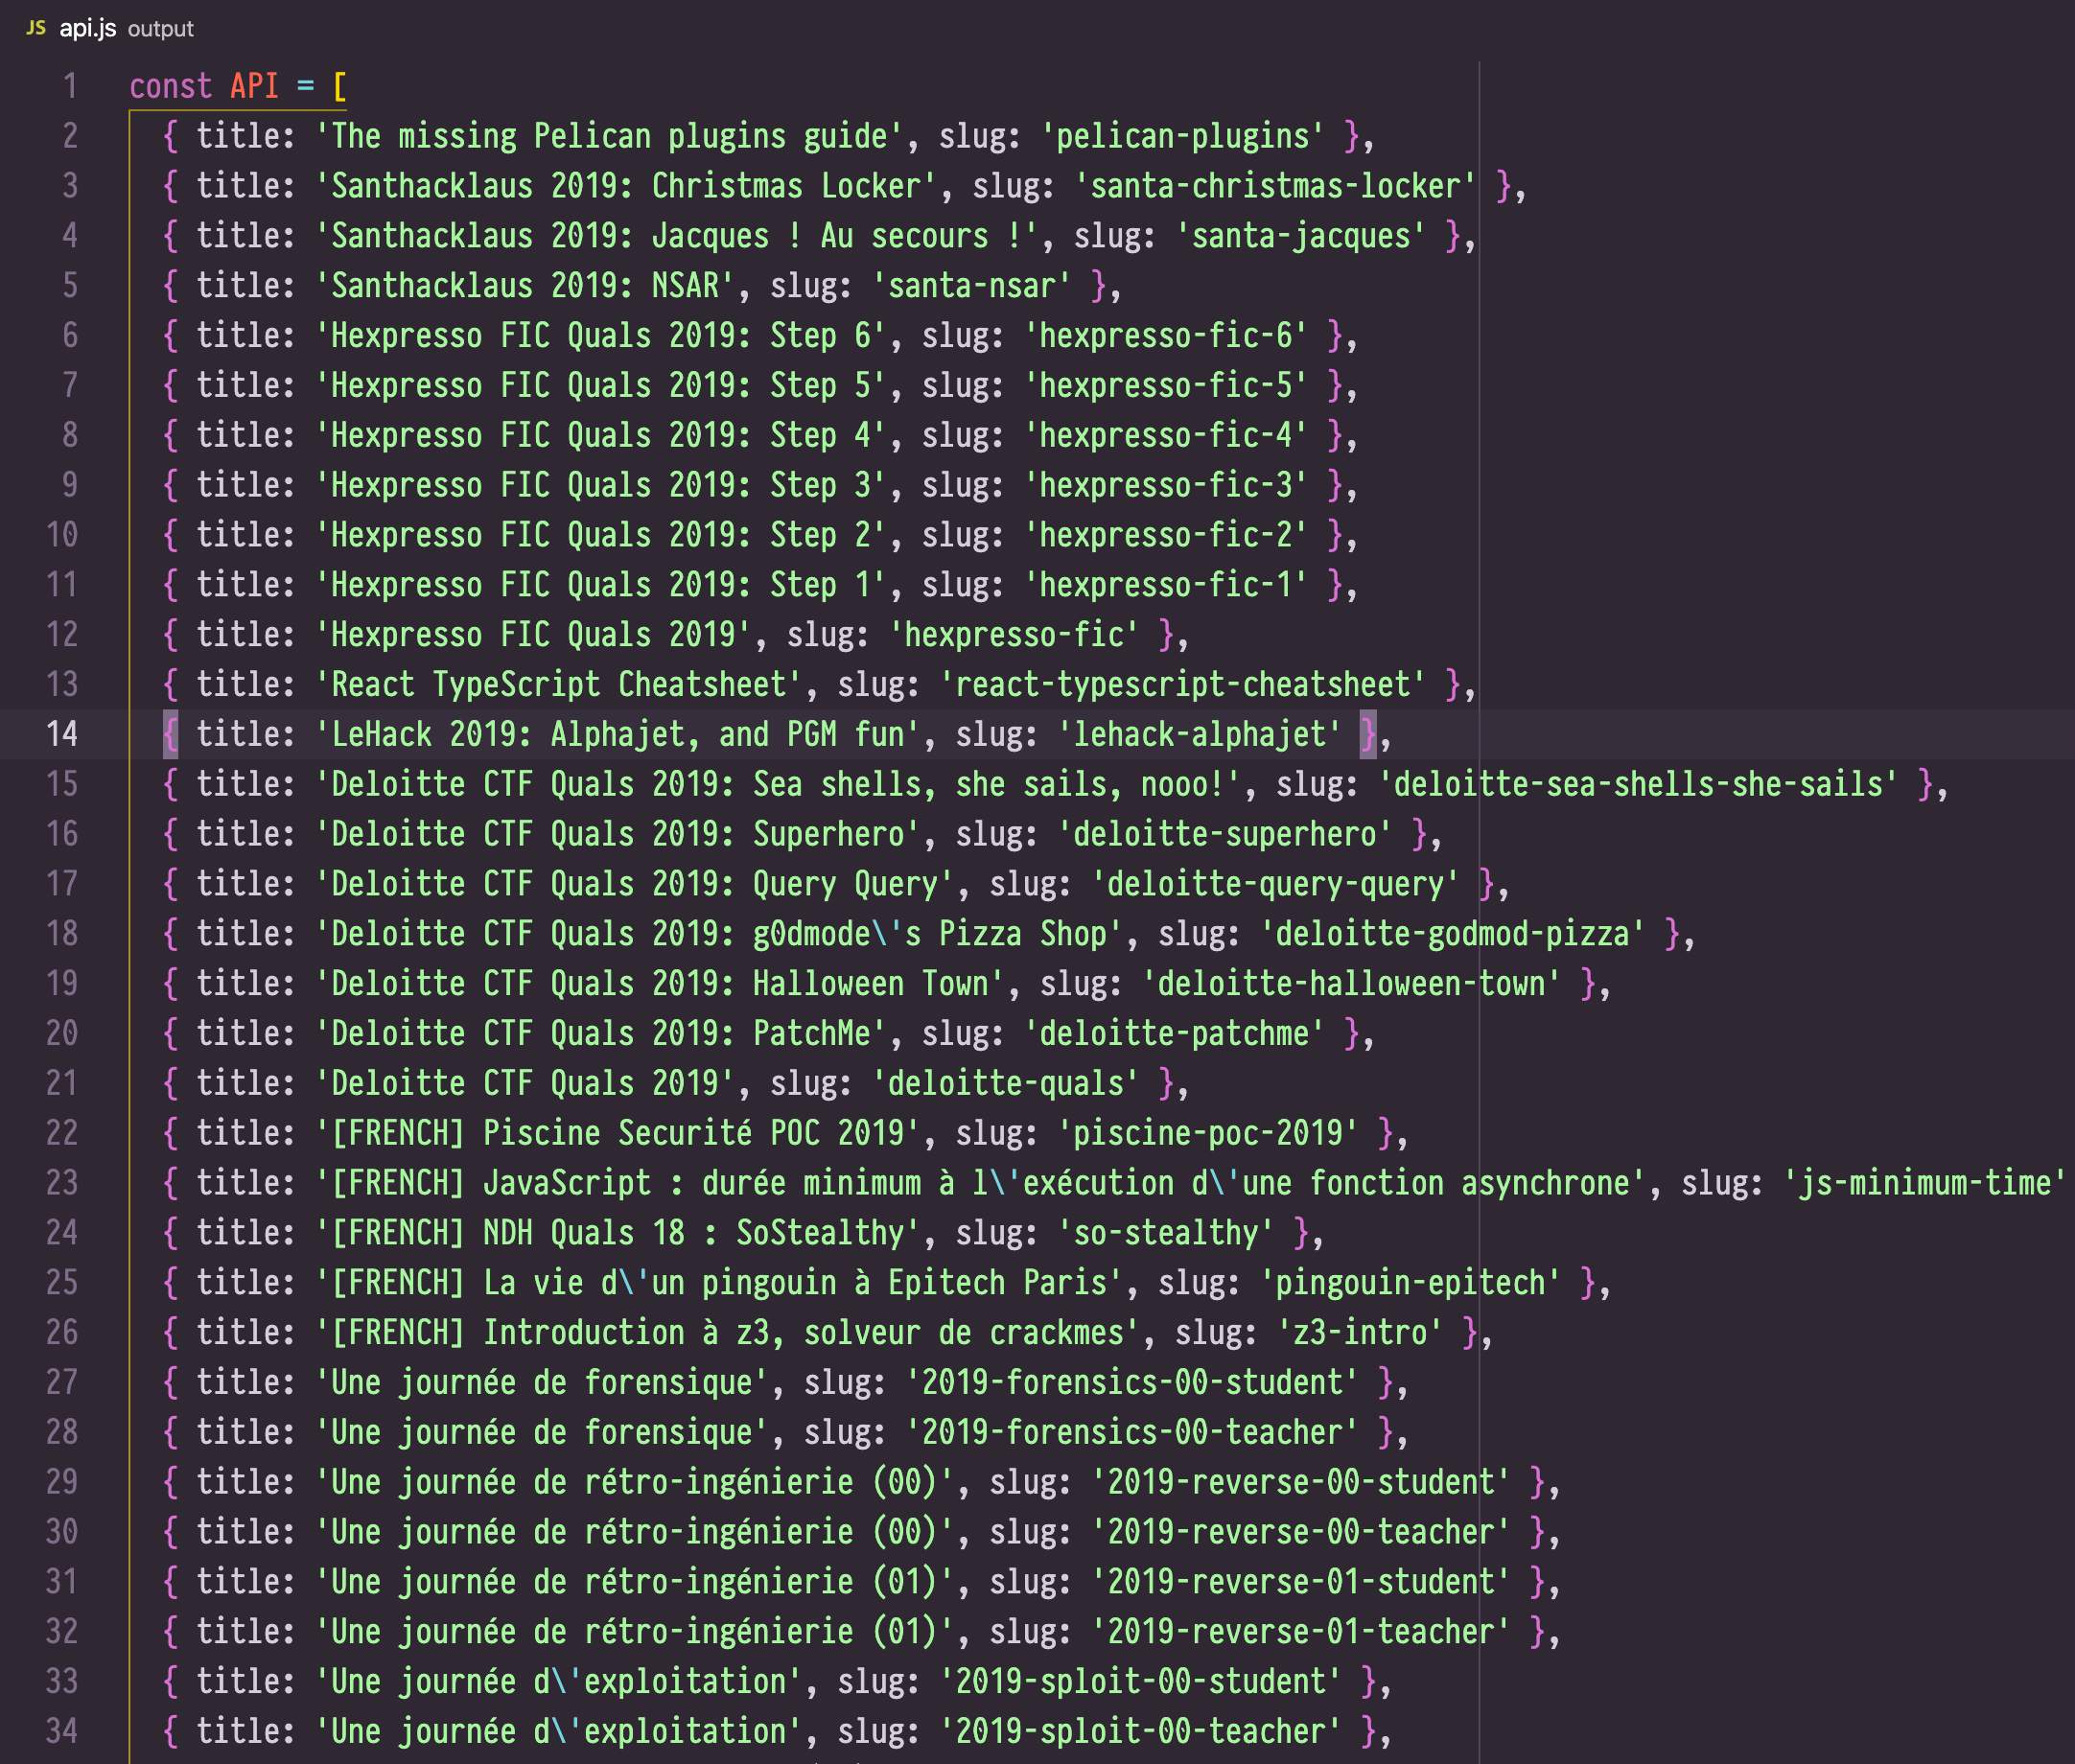
This is what our plugin generates. It looks quite simple and it actually is! We only need to iterate over the documents, get their titles and slugs, and finally generate a valid JavaScript file.
Let’s begin with the signals:
def get_generators(generators):
    return APIGenerator


def register():
    signals.get_generators.connect(get_generators)
The get_generators function will be called when Pelican collects the
generator and APIGenerator will be returned. This class is a Pelican
generator. What does it look like?
class APIGenerator():
    def __init__(self, context, settings, path, theme, output_path):
        pass

    def generate_context(self):
        pass

    def generate_output(self, writer):
        pass
The constructor receives quite a few parameters. Here they are:
context(dictionary), the same context object we talked about before. In the constructor, it is almost the same assettings. However, it will be updated by other generators and eventually allow us to access all our articles and pages.settings(dictionary), all the global site settings. Mostly parsed frompelicanconf.py.path(string), absolute path to the content directory.theme(string) absolute path to active theme directory.output_path(string) absolute path to the output directory.
The two parameters we are interested in are context, in order to go through
the articles and pages, and output_path, in order to know where to write
our output. So let’s just save references to them:
def __init__(self, context, settings, path, theme, output_path):
    self.context = context
    self.output_path = output_path
We are done with the constructor. We are not going to define the
generate_context method as we will not update the context. If we had some
other module that was based on the API, we would surely do it though.
Finally, let’s define the generate_output method. Note that we don’t use
the writer that we get as a parameter as it is mostly made for the
articles/pages generators and use templates. In our case, it is much simpler
to directly implement the writing logic.
def generate_output(self, writer):
    # Final file path
    path = os.path.join(self.output_path, FILENAME)

    # Extract pages and articles
    content = \
        self.context['articles'] + \
        self.context['pages']

    # Remove the content that must be excluded
    content = [c for c in content if c.slug not in EXCLUDE_SLUGS]

    # Get all the slugs, and titles
    slugs = [c.slug for c in content]
    titles = [c.title for c in content]

    # Escape quotes in the title
    titles = [title.replace('\'', '\\\'') for title in titles]

    # Format objects
    objs = [
        f'{{ title: \'{title}\', slug: \'{slug}\' }}'
        for title, slug in zip(titles, slugs)
    ]

    # JavaScript array content
    js_array_elements = ',\n  '.join(objs)

    # Put content into array
    js = JS_BASE.format(js_array_elements)

    # Write JS file
    with open(path, 'w+') as fd:
        fd.write(js)
The actual logic is not important. You can take a look here to get the source code for this module.
What we can observe is that self.context has been updated with the articles
and pages of our site so we can easily get all the information we want. And
of course, we reuse self.output_path in order to know where to write.
Our generator is now complete!
Wrapping up
This the end of this guide. You might want to take at look at this series that goes through the development of a teaser image plugin next.
The best learning resource for Pelican modules definitely is the Pelican source code itself. It is totally readable and is always up to date. Reading other people’s modules also help a ton.